So I finally was able to meet up with my instructor after getting my SP140 back in April.
My instructor was doing an inspection and realized that he could press the prop into the top part of the hoop, and said I can’t fly this. I then mentioned that one of the times I ran it up a few weeks ago I had a rattling noise for a few seconds and that I never found the source. We then found a mark on the top spars that lined up with the edge of the propeller blades. He says I’m lucky I haven’t destroyed my prop.
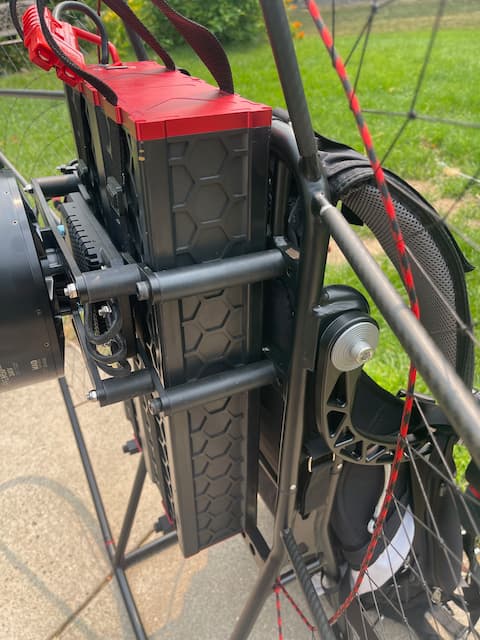
I have verified that my hoop is on properly, the net is attached on the front side and the spars are medium on top, small, and then long on the bottom.
Is there anything else I can check? I plan on taking pictures tomorrow when I get some daylight. I can’t think of anything else other than maybe a defective top frame with incorrect angles on the spars.
You will not get the perfect distance all around. Maybe a few units do have it. Mine does not. This is why you should a hang test and adjust as necessary
Possible problems: wrong spars location - refer to Paul’s video on his website.
Motor connections to the frame - check the length of the 4 bolts if equal.
Check the receiving ends for the spars on the frame to see if they are at the correct angles - top - side - bottom.
Check that your hoop is properly installed with the net on the correct side of the hoop.
Check that your net is properly installed and tightened.
There will be some flex no matter what but should not be that bad.
Posting photos of your propeller will not help much. It would be more helpful to show the entire SP resting vertically on a hard surface and the photo taken from the side while avoiding camera lens distortion if possible. Take photos of the motor connectors to the frame, etc…
As mentioned in my original post, I did check the spars against the video.
top to bottom: Medium, Small, Long
They measure 23 3/8", 22 1/2", and 23 5/8" respectively.
I’m not aware of bolt sizes being different on the motor mount. I can’t see them because of the spacers, are you suggesting the spacers could be different lengths?
Mine is kind of reversed with 6" at the top and 3" at the bottom. It should be the same all around but rarely the case. Hard to tell from a photo. Something you could perhaps do, would be to use a carpentry square with a level built-in to find out if the motor is actually parallel to the frame. Place the SP on a perfectly flat surface using a level, then place the level at the top of the motor to see if it is actually at the same angle the frame is. Then use the square with the level and check the hoop. Compare all your measurements. You may find a few odd numbers. Just a thought!
Good luck!
The net rivets on the hoop are supposed to be front side, correct? Thats what it appears like from all photos I’ve seen, and its how I installed it. I’m tempted to flip the hoop and see how it fits since the nubs for the spars are welded at an angles so it would be in a different position. Is it possible for the hoop to have had the net riveted on the wrong side?
I’d say his top post for the CF medium tubes has been welded with too much angle towards the back. The side angle photo with the hoop angled like that makes you think the motor is pitched forward but we won’t know until he puts a square on it. JM2C
You can gently bend the top posts forward if you are careful. You can use the spar to get leverage but again be careful not to split the spar. I’ve adjusted mine, it doesn’t take much. If the post becomes curved the spar will get tight so you may need to file some high spots off. Color the inside of the spar with a marker then twist the spar on the post. File the areas where the marker gets rubbed onto the post.
I got the same advice from Paul @ OpenPPG. He asked if the whole hoop was in-plane, and after looking closely I realized the bottom half was in a different plane than the top half. I bent the two top posts forward, I now have a pretty even 4 1/2" spacing around the entire frame.
Isn’t there the risc of cracking the welding of the posts when bending them? You just put the carbon rod on it and grab by the base and pull? I was thinking of taping on the post head with a rubber hammer…
Definitely. I waited until I got instructions from OpenPPG to do that as I didn’t want to make things worse. Paul told me if I broke the welds he’d send me a new top frame.
That said, I am a little worried about having weakened it… but I suppose I have more to worry about than that if the top of my frame is hitting something…
Yes there is a concern for cracking which is why I said GENTLE! He didn’t need to bend them enough to induce cracking but bending them too far would crack them. We are only talking about one degree or so. NO, DON’T just grab it and pull it! I do kind of a pulsing or bouncing motion if that makes sense. Leverage is much more effective and more controlled than tapping it with a hammer. Leverage also helps it to bend at the base of the post instead of the middle.